Sunday 6th November
I’ve just got my hands on the course material for The Art of Photography (henceforth AoP) and have started making some progress through it. The course material seems well put together and looks like it is suitable for a wide range of levels of background experience. My own background is very technical and my hope is that I can use this knowledge as a tool to explore some aesthetic elements of photography.
Having read through the introduction, our first few projects appear to tackle some of the fundamentals of camera technique which are of critical importance to image making. I’d say that I’m already comfortable with the techniques covered in the introduction, but I’m keen to attempt the shots requested in the exercise for fear that over confidence will cause problems when I start moving outside of my comfort zone.
Over the past few years, I’ve spent lots of time thinking about the mechanics of photography and optics and have found a beautiful overlap between the geometry of my maths background and the questions I started asking about the processes of using lenses and cameras. I think a good start to my learning log / blog might be to start formalising and recording the thought experiments that make up my knowledge of optics. My approach is initially quite technical and makes sense to my overtly logical outlook. I haven’t seen camera optics described in this way and I’m interested to know if others find them illuminating (no pun intended). I hope these will complement the exercises in the course and will also form a starting point for some of the more technical posts I’m thinking about for the upcoming assignments.
Part 1 - An idealized camera
In reality, a modern camera is a complicated beast. Even ignoring the intricacies of a digital sensor, the optics of an entry level digital SLR alone serve to obfuscate the fundamental purpose of a lens and camera. At its most elementary level, a camera is a machine used to capture the light from a real world scene at a given moment in time and render it onto a 2 dimensional plane with some degree of permanence. As we begin to explore the workings of such a machine let us start by considering an idealized version of a camera and examining what information we can deduce.
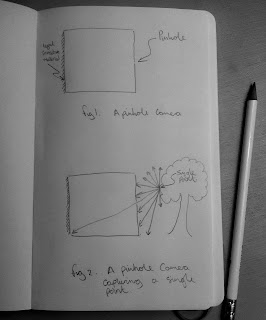
A pinhole camera can give us a tremendous insight into the behaviour of light and light capturing devices. In essence, a pinhole camera consists of a sealed box with a tiny hole on one face and a light sensitive element on the adjacent inner face; either a piece of film or a digital sensor. Figure 1 shows just such a device.
Let us now consider the operation of a pinhole camera. Figure 2 shows the camera placed near a tree. If we consider a single point on the tree then we can imagine light from the sun and surrounding environment hitting this point and the point responding by bouncing light back in every possible direction. Only the ray which intersects the pin hole is allowed to enter the camera, and it’s illumination of the light sensitive material is limited to a tiny point towards the bottom of the diagram.
The action of taking a picture can be thought of as the combined effect of capturing the light from every single real world point visible from our camera position. Figure 3 shows this situation and demonstrates the (inverted) image captured by a pinhole camera.
Very quickly we can see a link between the dimensions of our pinhole camera box and the extent of the scene captured in our image. Figure 4a shows what happens when we build a longer box; our field of view (FOV) becomes narrow and only elements of the scene existing within a relatively thin cone are blown up onto our film plane. Figure 4b shows the effect of using a short box; our FOV becomes large and we capture light from a wider area.
Using some simple trigonometry, we can precisely define the field of view for any given combination of box length (which we will henceforth call focal length) and film plane size. Figure 5 demonstrates these calculations. The details are not important, but what is worth noting is that FOV is simply a function of focal length and film plane dimensions. This will be crucially important when we look at how changing lens changes the portion of the scene we record in our image. It will also explain why the same lens fitted to cameras with different sensor sizes will appear to behave differently (something camera manufacturers explain away with a ‘crop factor’).
In the next post, I’d like to extend the pinhole we’ve looked at in these examples into an idealized lens so that we can explore focus, aperture and exposure…


No comments:
Post a Comment